Dear Moderator,
Thank you for looking at my blog, and hope you enjoyed it!
Devki (:
Monday 14 March 2011
Sunday 13 March 2011
Evaluation 7: Looking back at your preliminary task (the continuity editing task), what do you feel you have learnt in the progression from it to full product?
The aim of our project was to create a thriller opening of a fiction film. To give us a taste of the different camera shots and editing techniques needed, we were given a preliminary exercise, which involved 'filming and editing a character opening a door, and crossing a room and sitting down in a chair opposite another character, with whom he/she would exchange a couple of line of dialogue.' We had to demonstrate match on action, shot/reverse shot and the 180-degree angle. For this task, we did not carry out vast amounts of research, except the types of camera shots we were going to film. We did this by story-boarding all the shots. Whereas for our thriller opening sequence, we researched into real media products, and looked at what was successful about them. As our film opening had to be of a thriller genre, we had to research into thriller conventions, for example use of low lighting, not being able to see the characters identity to create an enigma etc. We also planned thoroughly each shot and frame we were going to create, and how we were going to edit the sequence for example the software's we were going to use. This enabled the process of making the film opening to go smoothly as we knew what we were doing, and what needed to be done, and so accordingly planned out our time.
During the process, I have learnt a variety of different camera angles and shots used in film production. When we produced the preliminary task, I had very basic knowledge of shots and angles. Examples of shots we used in our preliminary task are long shots, close-ups and over-the-shoulder shots. The long shots, enabled us to introduce the character's full identity. The close-up helps to keep the audience's attention on the scene, emphasizing what is in the shot. Our knowledge of camera angles and shots developed when we began to research into different media products, and were introduced to them. Examples of new shots we learnt point-of-view, tracking, panning, mid-shots, high angle etc. I also learnt continuity techniques. The preliminary exercise taught me that to make a film successful, the shots have to flow. Our film was successful at creating continuity as we planned how we were going to crop each frame.
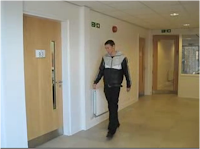
The screengrabs above are examples of a 'long-shot'. On the left is the shot from our thriller opening sequence and on the right is the shot from our preliminary task. This shot usually introduces the beginning of every scene. It sets in motion the audience's perception of time, place and action of the scene that is about to happen.
These are examples of close-up shots. They are used for showing detail and emphasizing what is in the frame. On the left is the shot from our thriller opening sequence and on the right is the shot from our preliminary task. To carry out this shot, the camera has to be fairly close to what is being concentrated on.


During the process, I have learnt a variety of different camera angles and shots used in film production. When we produced the preliminary task, I had very basic knowledge of shots and angles. Examples of shots we used in our preliminary task are long shots, close-ups and over-the-shoulder shots. The long shots, enabled us to introduce the character's full identity. The close-up helps to keep the audience's attention on the scene, emphasizing what is in the shot. Our knowledge of camera angles and shots developed when we began to research into different media products, and were introduced to them. Examples of new shots we learnt point-of-view, tracking, panning, mid-shots, high angle etc. I also learnt continuity techniques. The preliminary exercise taught me that to make a film successful, the shots have to flow. Our film was successful at creating continuity as we planned how we were going to crop each frame.


The screengrabs above are examples of a 'long-shot'. On the left is the shot from our thriller opening sequence and on the right is the shot from our preliminary task. This shot usually introduces the beginning of every scene. It sets in motion the audience's perception of time, place and action of the scene that is about to happen.


These are examples of close-up shots. They are used for showing detail and emphasizing what is in the frame. On the left is the shot from our thriller opening sequence and on the right is the shot from our preliminary task. To carry out this shot, the camera has to be fairly close to what is being concentrated on.

This is a point of view shot. It enables the audience to see the scene from the character's perspective.

This is an establishing shot. It used to introduce or set the scene. It is designed to show to show the audience where the action is taking place.It is usually a wide shot or extreme wide shot.

This is high angle shot. The camera is elevated above the action. They make the object photographed seem smaller, and less significant. It may portray status, so in this case the character is seen to be vulnerable and helpless.
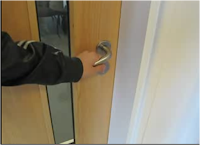
When we were editing our preliminary task, we were introduced to a software on the mac, called 'Final Cut Express'. The software enabled us to cut/crop frames, create titles and add special effects to the frames. At first it took it bit of getting used to, but as we progressed we became familiar and confident with all the different tools involved. While creating our film opening sequence we also learnt how to use other software's such as Adobe After Effects and Garageband. After producing the preliminary task, I felt we learnt that planning and research is a big part of creating a product. This helps us to know exactly what we are doing, while shooting, and what we need to achieve to create a successful film opening. My knowledge of camera shots/angles and editing techniques has developed a lot since we created the preliminary task.
Overall, I feel that our thriller film opening was quite successful as we had researched thoroughly into thriller conventions and were able to create these. We found the most successful part of our opening were the 'torture scenes'. It had good use of lighting linking with the conventions of the thriller genre.
Saturday 12 March 2011
Wednesday 9 March 2011
Evaluation 1: In what ways does your media product use, develop or challenge forms and conventions of real media products?

Above is a 9 frame sequence that has been screen grabbed from our opening sequence which we feel portray typical thriller conventions.
Here are the aspects I will consider across the nine frames:
- Setting and Location
- Titles (fonts/style)
- How the characters are introduced
- Lighting
- Genre and how the opening suggests it
- Camerawork/Editing
- Costumes/Props
- The title of the film
- Story and how opening sets it up

FRAME 1
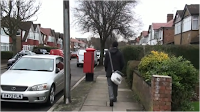
This was the first shot in our thriller opening. It is an establishing shot of a deserted area with a few houses. Using this shot enabled us to introduce the scene/setting to the audience. We chose to film an area that deserted to create a feeling of emptiness as though something is about to occur. The shot illustrates an eerie atmosphere, and a sense of mystery and suspense. This scene would also keep the audience curious as to what going to happen. We chose to film our shots in this setting as it is a ordinary familiar environment that can relate to all audiences.

FRAME 2
The second frame in the storyboard is of one of the credits saying 'Casting by Devki Mistry'. The title has been coloured in a harsh, dark tone of red which relates to thriller conventions, as it represents blood or danger. The colour stands out against the black background, making it the main focus of the frame. The background has been filled with a simple yet bold black colour. The font style is similar to that of how a typewriter writes. We added an effect to the text so that it 'flickers' and shakes a little, making the text unsteady. This was done to create an unsettling atmosphere to get the audience anxious.

FRAME 3
This is the first time a character is introduced into the opening sequence. It is a medium-long shot of a male walking away from the camera. As the character is on his own, it suggests to the audience that he is one of the main characters. There are not other characters in the scene, therefore putting all the attention on the male, which was our intention. The audiences are unable to see the characters identity creating a sense of ambiguity. The frame is of the male walking casually creating an enigma, leading the audience to think that something is about to happen. The character is dressed in casual clothing, which was intended, to hint to the audience that he is an ordinary person, getting on with his everyday life.

FRAME 4
This is the fourth frame in which lighting was a key feature to meet the thriller conventions. In the frame the audience is able to see hands 'playing' around with sharp tools. It was an extreme close-up shot of a characters hands. This was done to make the hands and tools the focal point of the scene. The colour of the tools were black and dark red, adding to a thriller convention. The props used clearly related and added to the genre - psychological thriller. The lighting was very successful as it intensified the atmosphere. It was very low key, and created shadows. A slight glow upon the tools was created to make the props look dangerous and threatening. The props varied in size and shape. All the tools were lined up, suggesting the character who is playing about with the tools was psychopathic.

FRAME 5
The fifth frame is a point of view shot, of the victim looking into an empty alleyway. The scene does not show what is at the end of the alley, which creates tension as the audience are unaware of what may appear. Typically an alleyway is seen as a place where an attack may happen, which also creates suspense. In this part of the sequence the character stops to look into the alleyway and then turns around to look behind him. This in a sense begins to introduce the characters feelings/emotions. This suggests the character may be feeling apprehensive or slightly conscious, as he looks behind to find he is alone. The scene and setting clearly demonstrate a genre of thriller, due to the empty and deserted surroundings. It gets the audience intrigued to know what is going to take place.

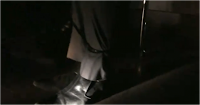
The sixth frame is one of the 'cross-cutting' shots in our sequence. It shows a pair of legs being tied up with a black rope, by the antagonist. We chose to shoot this as a close-up of the action, so that the audience would not get distracted by anything else in the frame. The image is slightly obscured, and has been taken from slightly uncomfortable shot angle. Shadows have been created due to the low lighting which is keeping in with the conventions of the thriller genre. The shot creates enigma as the audience are not able to see the characters faces. The frame was edited as it had to be slotted within the walking frames of the character.

FRAME 7
Frame seven shows the victim being abducted. This is the first time the audience is introduced to the second character - the antagonist, although his full identity is still not fully revealed. This frame somewhat concludes the opening, as it gives the biggest hint to the audience that the two different 'cross-cutting' frames are linked. We chose to do a high angle shot, to show a higher status or power of the antagonist, making the victim look helpless and vunerable. We are not able to see the characters face expression creating mystery and tension. The antagonist is dressed in a black leather jacket whereas the victim is dressed a smart grey coat, wearing a bag, demonstrating the teenage sub-genre. The colour black is a more bolder than grey.


FRAME 8
This is the title of the film - Captivity. It has been centered in the frame, to be the main focus point. To create the title we used a programme called 'After Effects'. We chose to keep it plain and simple. The title is bold and has been filled with a glowing white colour, which stands out against the black background. We added a little animation into a title, so that a sort of red liquid moved through the title, representing blood. Similarly to the credits in our movie, the title of the film flickered and jumped a little, to create an unsteady atmosphere. The size of the font was fairly big, making it clearer and easier for the audience to read.

FRAME 9
For our opening we decided to have cross-cuttings between two scenes - a 'walking scene' and a 'torture scene'. Frame nine portrays the last torture scene shown in our opening sequence. In this frame we used a high angle shot of the victim to show vulnerability and weakness. Evidently the audience are able to see that the victim is being tortured, as he has been sellotaped up around his mouth. The antagonist is somewhat intimidating the victim by running a blade down the side of the victims face. The lighting focuses on the victim making him the focus of the frame. Yet again the audience are not able to see the antagonists face, creating an enigma, leaving them wanting to be able to see his identity.

Challenging forms and conventions of real media products

Above is a nine frame sequence of a 2006 movie called 'Captivity'
Frame one is the name of the distribution company - 'Lionsgate'. The name has been written in block capital letters, creating boldness, making it clearer and easier for the audience to read. The block letters stand out against the the misty red clouds/smoke that brightens in the background. The text has a maroon coloured shadow, adding depth to it. The title also has a slight glow effect added to it. Evidently is has can be assumed that the film will be a thriller due to the dark colours used.
This is the first frame in which the audience is introduced to the first character. It is an extreme close-up/high angle shot of a person's eyes. There is a sense of fear in his eyes. The character seems to be concentrating on something, scared. He also looks tired, and worn out. Similarly to our media product, the character has a bright light that has been concentrated on his face. His full identity is not shown, creating an enigma, as the audience are still not able to fully see him. Low lighting has been used, keeping in with the conventions of the thriller genre. The lighting also has a slight orange tint, creating a mysterious eerie atmosphere.
The third frame in the sequence is a low angle shot of a pair of hands stirring in a pan. This shot may have been used to show power and a high status. The audience are introduced to the second character, possibly the antagonist. The character is wearing black gloves. The camera first focuses on the antagonist stirring in the pan, and then changes its focus to a carton reading 'Plaster of Paris'. The audience are not able to see what is heating up in the pan, yet again creating an enigma.
Frame four is similar to one of the shots in our film opening. In this shot a syringe is being injected into a person. The audience would assume it is a victim. The black leather gloves appear again, which also hints that it is the antagonist. The shot is a extreme close-up enabling the audience to have their full attention on that. As the character injects the liquid, the frame fades out. In our thriller opening we have created a similar scene, where the antagonist runs a blade along the victim. The antagonist in our film opening also wears black leather gloves.
This is the fifth frame in the sequence showing a character casted up. It is a high-angle shot of the body. This may have been done to show a higher status or power of the antagonist, making the victim look helpless and vulnerable. We created a similar shot, in our frame 7, where we did a high angle shot of the victim. The audience are not able to see the characters identity and his face expression, creating an enigma. Wires/tubes are coming out of victims face.The victim is unable to move, as the casting is so solid, and he has been tied up. This is similar to our opening as the victim was tied up with a black rope.
The sixth frame is a close-up shot of the victims hand, strapped up. His hand is tense as he is unable to move. The victim is evidently in pain and is struggling to set free. This creates a sense of urgency and anxiety. Shadows have been created from the dim lighting. The actions in this frame fits in with the conventions of a psychological thriller as a person is being subjected to violent acts of torture. This shares a similar frame to our thriller film opening as we have a shot with the victim being tied up around his legs with a black rope. The shot is also similar as we used a close-up shot of the victims legs. This keeps audience focused on the action.
In this frame we are able to see a large unusual looking hammer. From the left hand corner we see a hand reaching for it. In the background we are able to see a couple of lit candles. This may explain why there is a slight gold tint in the colour of the lighting. There is also a another source of light - possibly natural light, as there is a slight reflection on the object. Due to the low lighting, thick bold shadows have been created. This makes the hammer stand out, and also creating depth, helping to keep the audience focused on the object. The background is slightly blurred, creating a eerie and misty effect.
This is the title of the film - Captivity. It has been centered but baring to the right. The text has been created used capital letters, coloured in a bright red tone. It stands out against the bold black background. It enables the audience to focus on the title without being distracted by the another picture in the background. Similarly to our film opening, they have kept it simple and plain, which is very effective. Beside the text is a what looks like a smudged 'bloody' finger print or blood splatter. This suggests a theme of unknown identity. This keeps in with the conventions of a thriller genre.
The last frame in the sequence is an establishing shot of the location where it all takes places. As the camera pans around, the audience are introduced the setting. We see that it is set in the state of America, as it shows a long narrow bridge. This is similar to our opening sequence as we use an establishing shot of the area at the beginning of our sequence, whereas they use it at the end.
Subscribe to:
Posts (Atom)